In last article - Get to Know Basic Knowledge of VLAN (Part 1) , you may know what is VLAN, the types of VLAN and etc.
WHAT IF YOU NEED TO SET UP A VLAN ACROSS MULTIPLE SWITCHES
Method 1
When planning the deployment for an enterprise network, you would find there are some users would be in different floors, but they belongs to same department. And then you may need to consider how to set up a VLAN across multiple switches.
Eg: Showing on below pic, it needs to set A & C or B & D to a same VLAN, but they are not in the same floor.
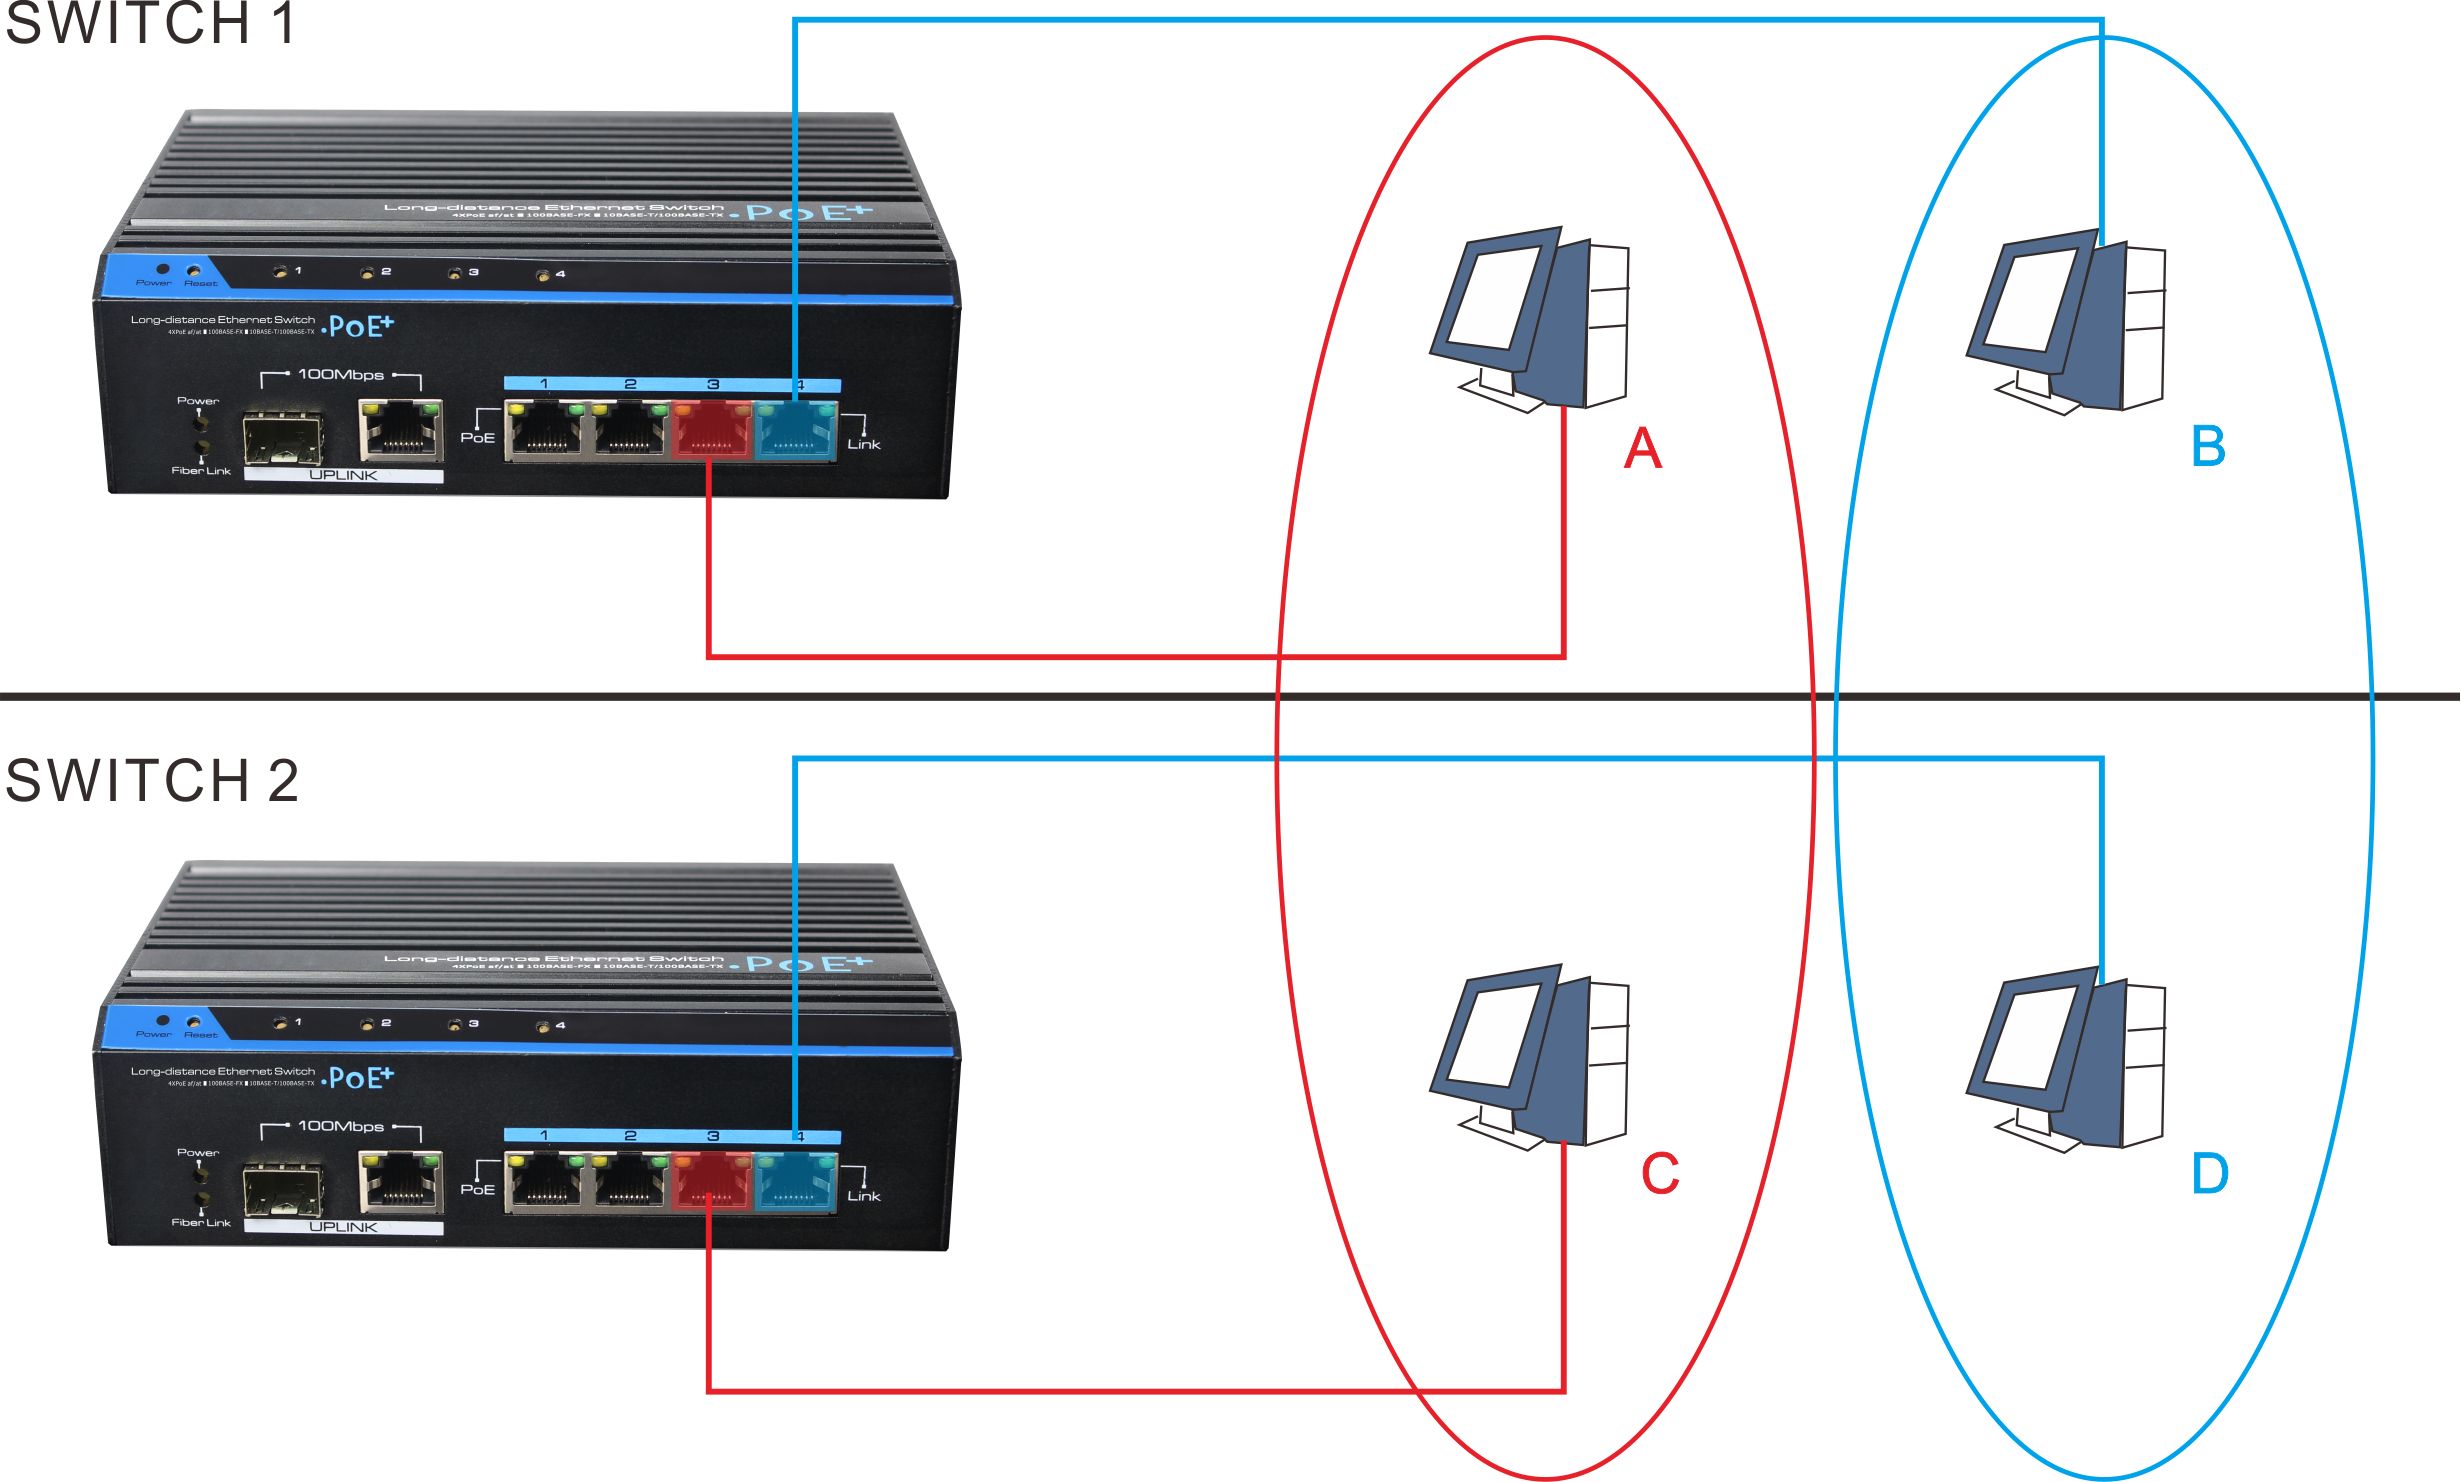
The simplest way is to set up VLAN-specific ports (Red and Blue to distinguish) on switch 1 and switch 2, and connect them. However, this is not the perfect one judging from scalability and management efficiency. For example, when set a new VLAN in an existing network, you need to add new cables between switches to enable this new VLAN intercommunicating. However, it is inconvenient to deploy wire between floors, and too many VLANs is also a wasting of port resources.
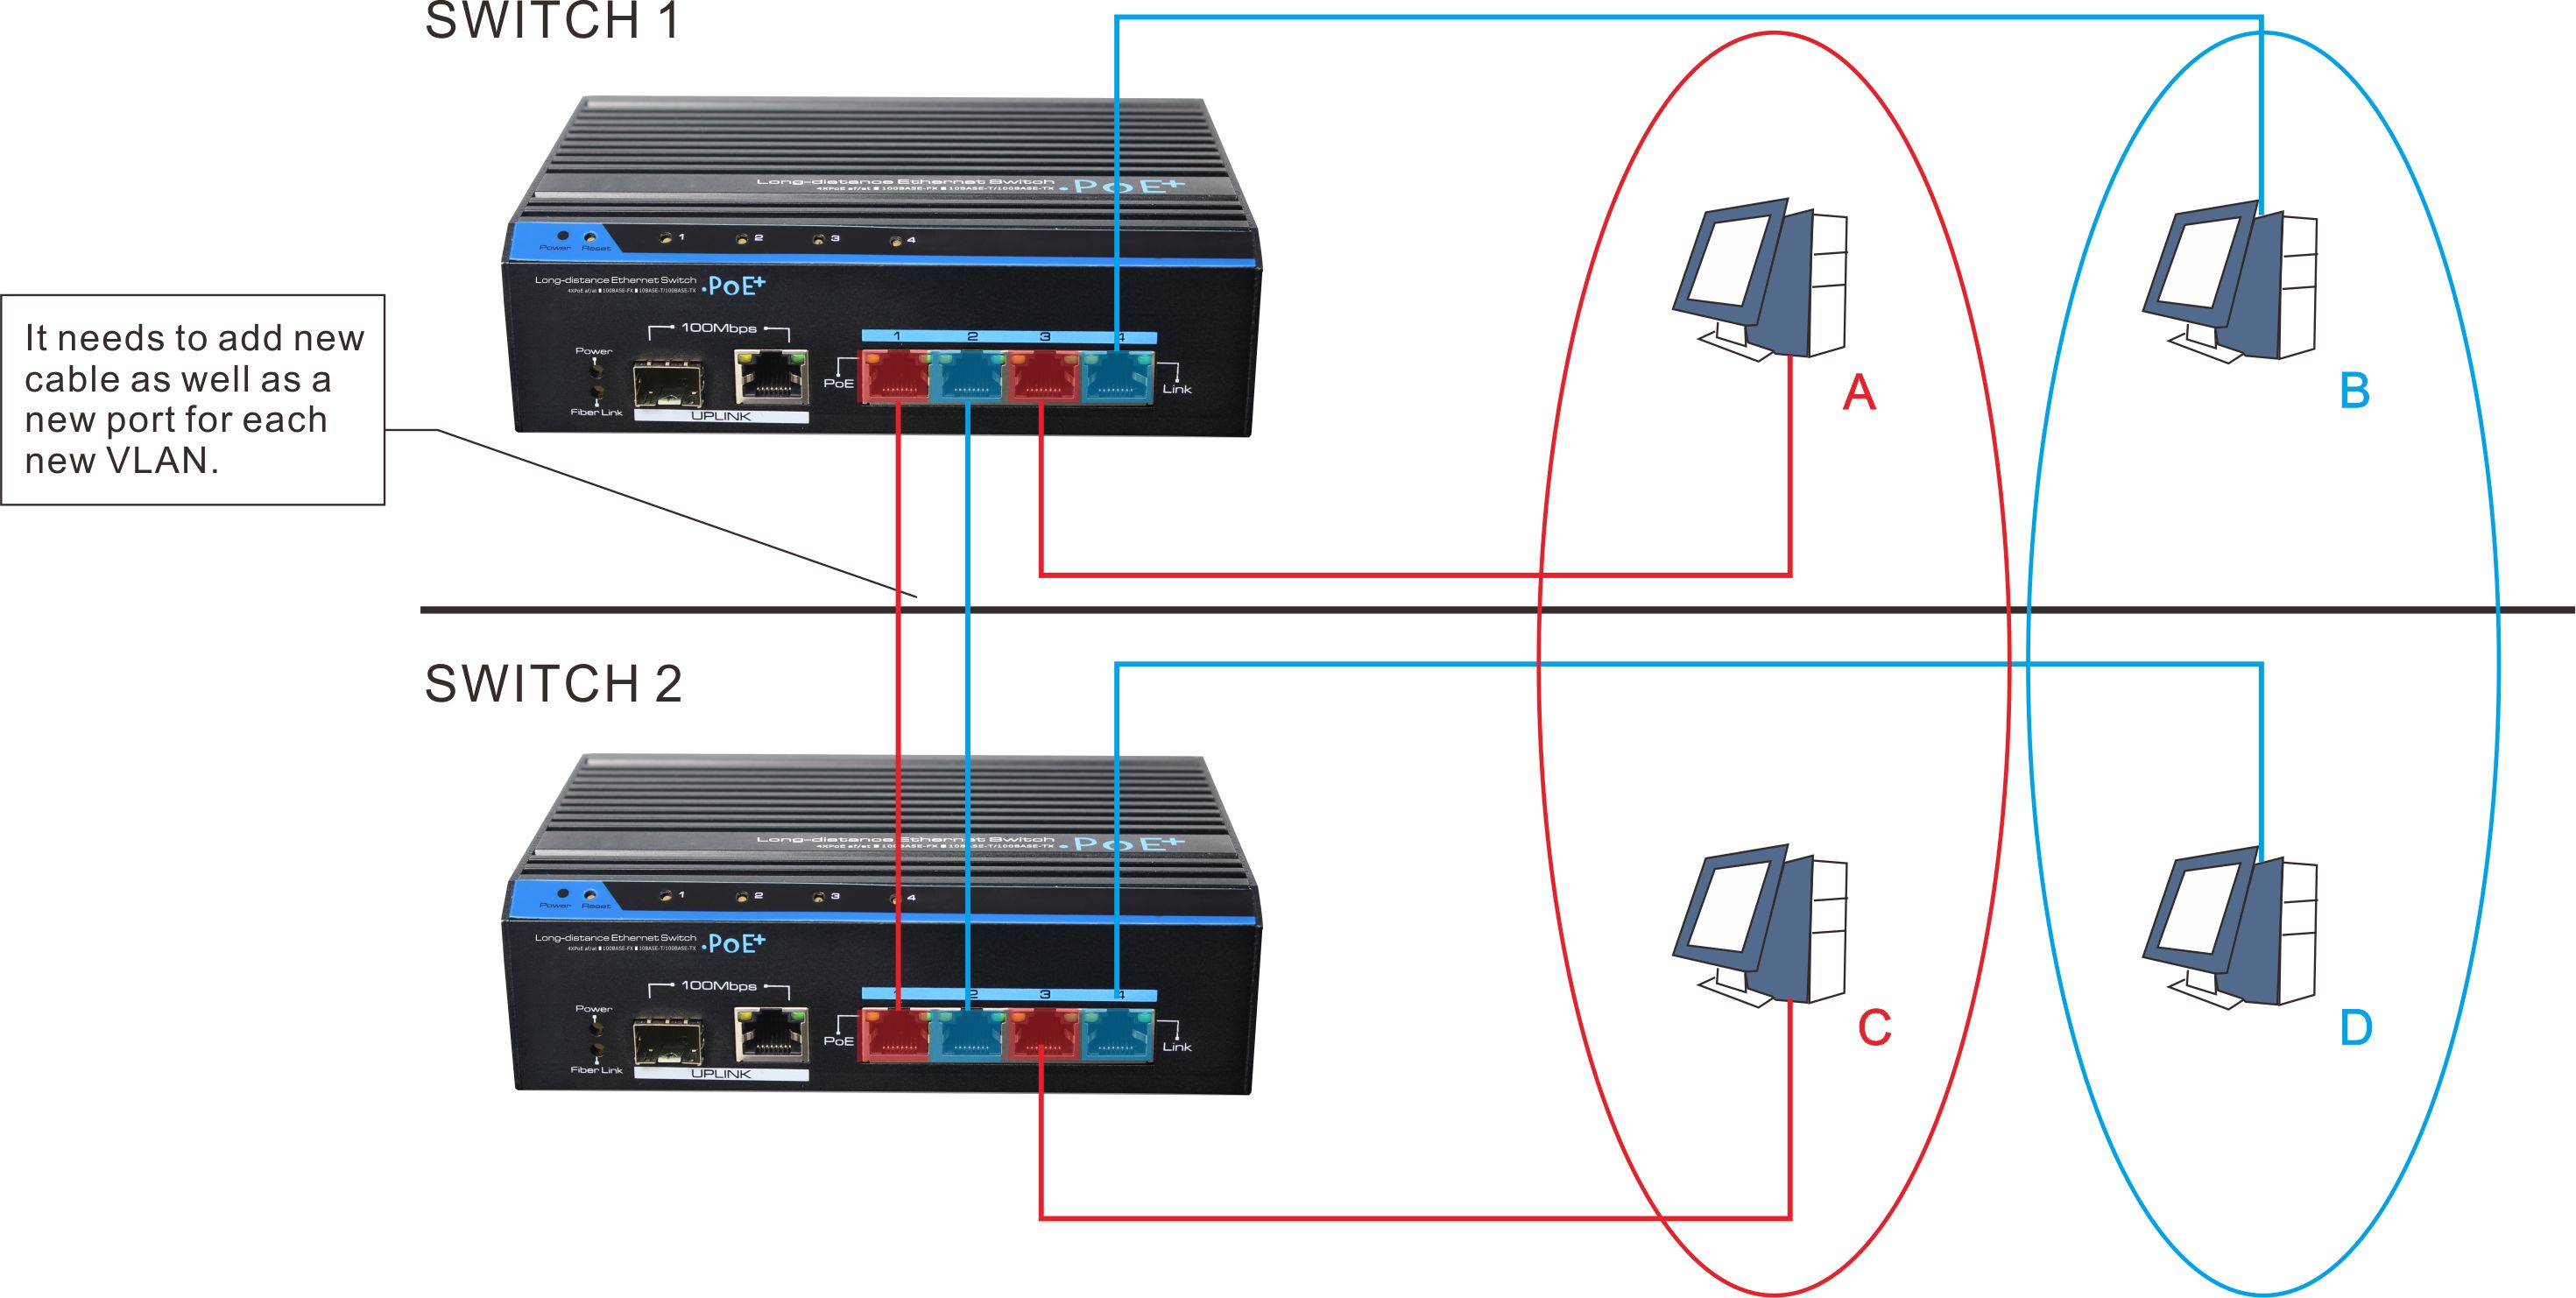
Method 2
To avoid this inefficient connection, engineers find a way to bring the interconnections of the switches together in a single connection, through the Trunk Link.
What is trunk link?
A Trunk Link is a port capable of forwarding traffic between multiple VLANs.
The frames, transmitting in Trunk Link, would be tagged special information for identifying their respective VLANs.
Let’s go back to the situation mentioned above. Through method 2, you only need to set interconnection ports as the trunk link to achieve intercommunication among different floors. Of course, the connecting cable is the common UTP cable. In this case, it is the interconnection between switches, so it needs to be connected by cross lines.
Next, let's look at how trunk links enable VLANs across multiple switches.
As the switch 2 receives the data frame and starts to check the VLAN identity tag. Once it finds the data frame belongs to red VLAN, the tag would be removed, and then the recovered data frame will only be forwarded to other ports belonging to the red VLAN as required. This transmission is only forwarding to the port which is matched by confirmed target MAC address and MAC address list. And it will be forwarded to all red vlan ports in case of data frame is broadcast frame, multicast frame or unspecific frame.
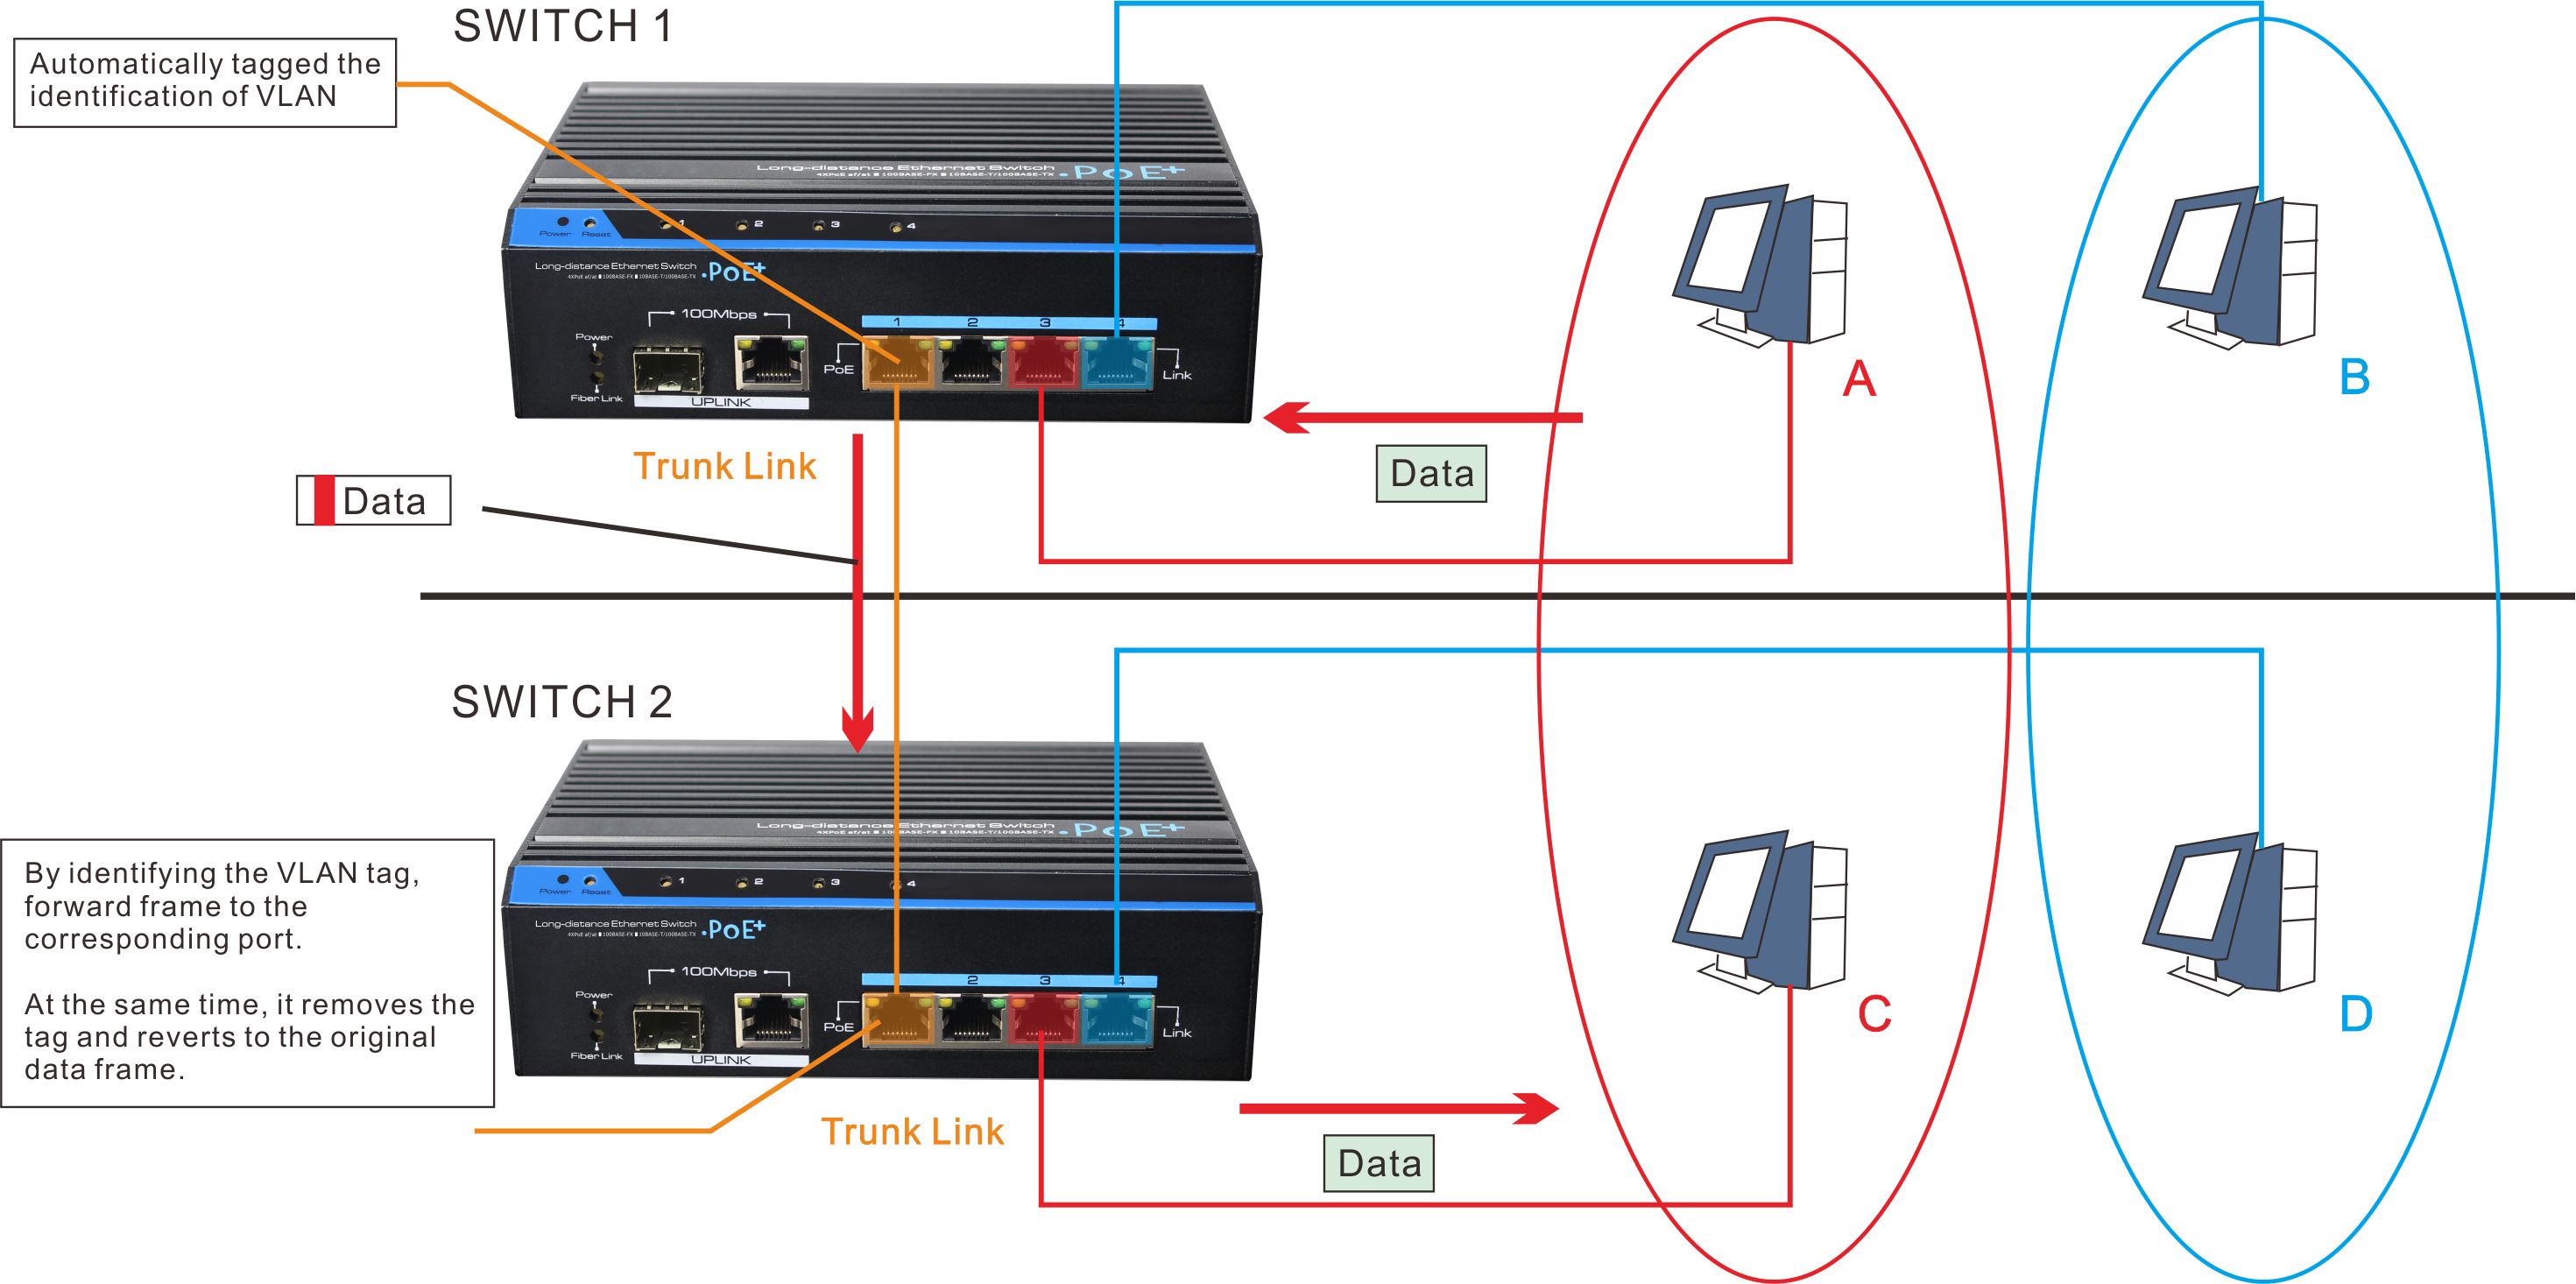
It is same way for blue VLAN.
PRINCIPLES OF COMMUNICATION BETWEEN VLANS
1. Communication Process within Same VLAN
Set IP addresses for each computer and router's sub ports.
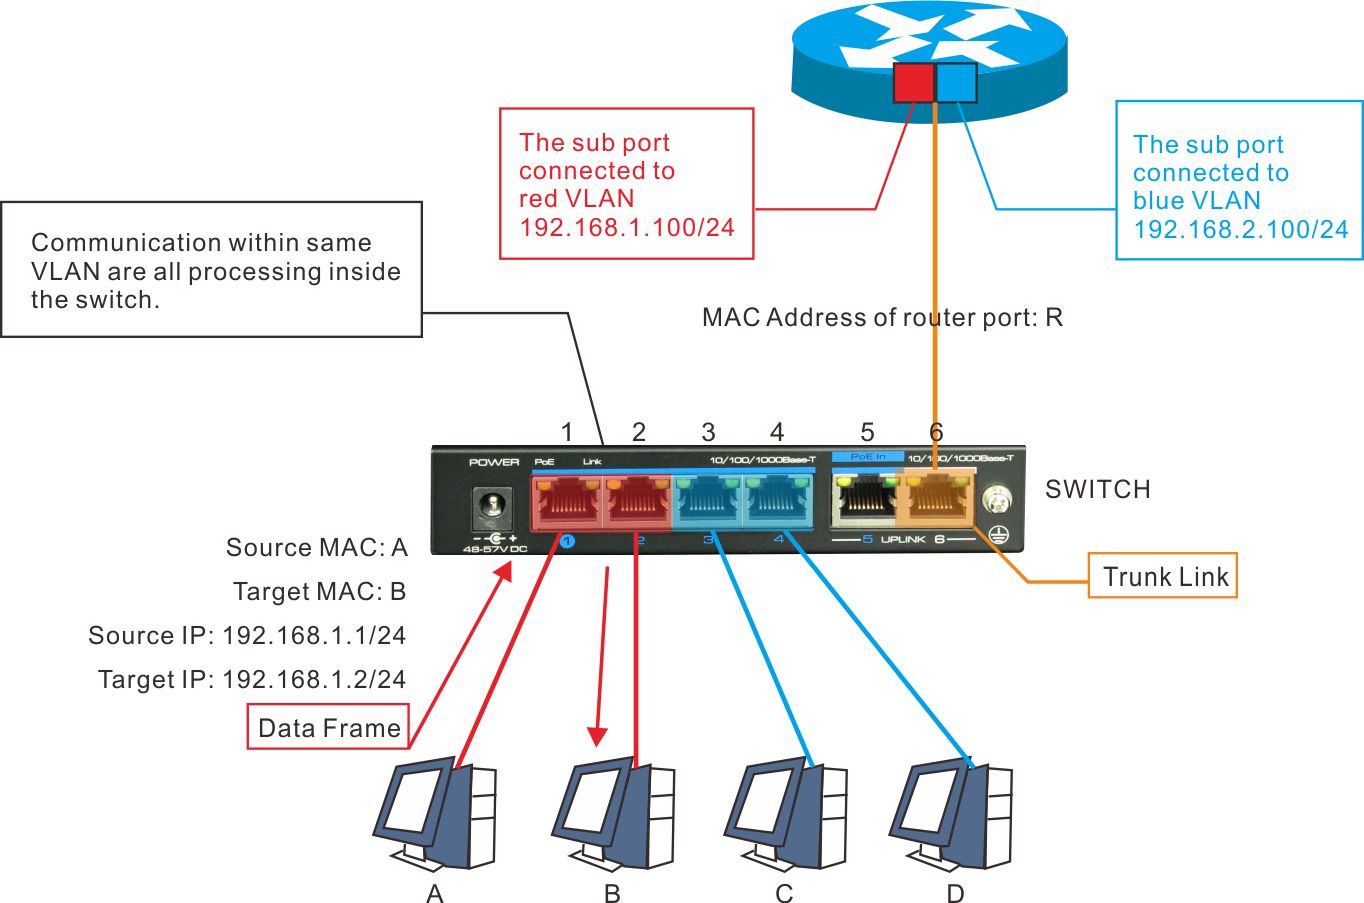
IP address of Red VLAN (VLANID=1) is 192.168.1.0/24
IP address of Blue VLAN (VLANID=1) is 192.168.2.0/24
The MAC addresses of the computers are A/B/C/D
The MAC address of the router's trunk link port is R
The switch generates the following MAC address list by learning the MAC addresses of the computers connected to each port.
|
Port |
MAC Address |
VLAN |
|
1 |
A |
1 |
|
2 |
B |
1 |
|
3 |
C |
2 |
|
4 |
D |
2 |
|
5 |
- |
- |
|
6 |
R |
Trunk |
Communication between computer A and computer B is within the same VLAN.
Computer A sends out ARP request information and requests to resolve the MAC address of B. After the switch receives the data frame, it retrieves the table entry in the MAC address list that belongs to the same VLAN as the receiving port. It turns out that computer B is connected to port 2, so the switch forwards the data frame to port 2, and finally computer B receives the frame. Both the transmitting port and receiving port belong to a VLAN, all the processing is done in the switch.
2. Communication Process across Multiple VLANs
Communication between computer A and computer B within the same VLAN.
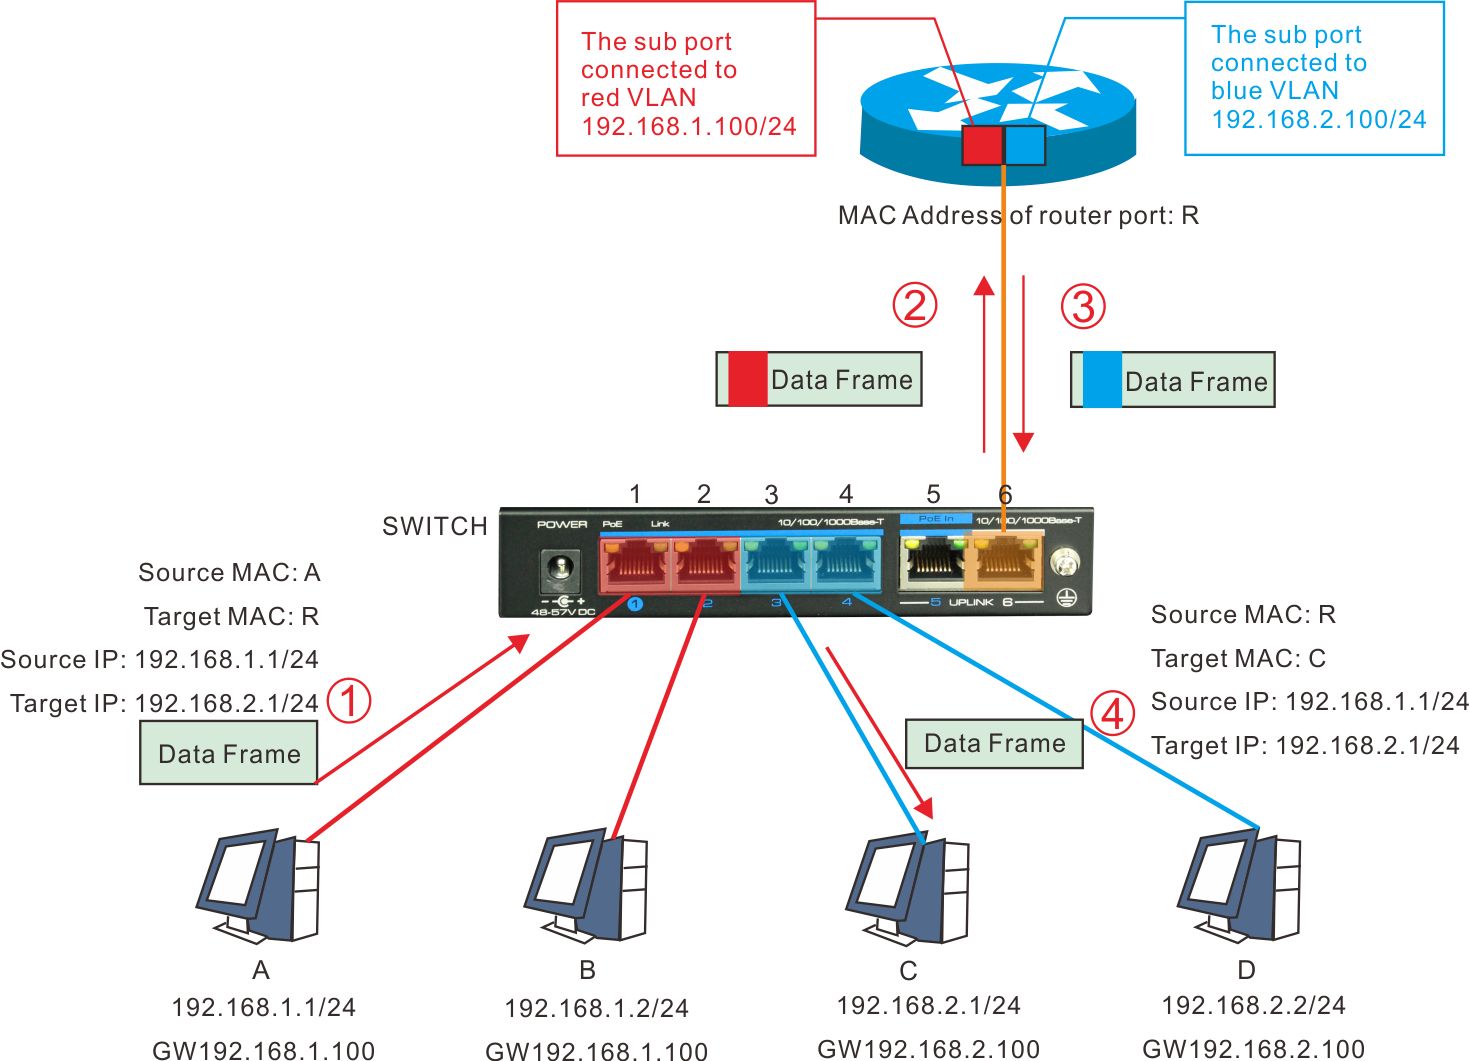
Process 1. Computer A concluded from the IP address of the communication target (192.168.2.1), that A & C do not belong to the same network segment. Therefore, the data frame is forwarded to the Default Gateway. Before sending a data frame, it needs to get the router's MAC address through ARP.
Process 2. After obtaining the router's MAC address R, the next step is to send the data frame to C as shown in the figure. In the data frame of ①, the target MAC address is the router's address R, but the embedded target IP address is still the address of the final object C to be communicated.
Process 3. After the switch receives the data frame ① on port 1, it retrieves the table entries in the MAC address list that belong to the same VLAN as port 1. Since the trunk link is considered to belong to all VLANs, port 6 of the switch is also a reference object. This allows the switch to send frames to MAC address R and forward them over port 6.
Process 4. Since with trunk link, the data frame from port 6 would be tagged an identification information of VLAN. After receiving data frame ② , the router would confirm its identification information of VLAN. Due to the data frame ② was from red VLAN and tagged its identification information, the sub port of the router, responsible for red VLAN, would receive and processing data frame.
Process 5. It would determine where to forward the frames according to the route table inside.
The target network (192.168.2.0/24) belongs to blue VLAN, and it is directly connected to the router though sub-port. Thus, the data frame could be forwarded from the sub-port that is responsible for blue VLAN. At this point, the target MAC address of the data frame is rewritten into the target address of computer C, as well as, it would be tagged identification information of blue VLAN. Namely is the data frame ③.
Process 6. The switch would retrieve the table items belong to the blue VLAN form the MAC address according to the VLAN identification information of the receiving data frame. The computer C (communication target) is connected to port 3, which is a common access link. After removing the identification information of VLAN, the new data frame ④ would be forwarded to port 3. Finally, the computer C can successfully receive this data frame.
In VLAN communication, even if both sides are connected to the same switch, they must go through the process of data sending -- switch -- router -- switch -- data receiving.
+86-755-83898016-863
+86-1501-2669-765
[email protected]
Note: To speed up our service to you, please make sure the field with " * " mark is filled before you click on "Submit" button, Thank you!